Showing posts with label Software. Show all posts

Tuesday, March 30, 2010

Other Projects - Photo Restoration

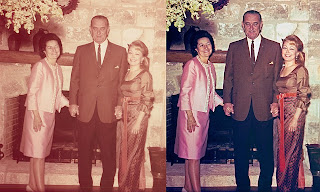
In addition to scanning the negatives and pictures that Ellen sent, I have been working on some other projects unrelated to family history. One of the more interesting ones is a photo of President and Mrs. Johnson that I restored for a friend at work.


In these before and after pictures, you can see (click for a larger image) that the original was very faded and retained very little color information. After scanning, and using only Photoshop Elements 5 (I still have not invested in a newer program!), I was able to tease some color and detail out of the picture. The steps I took were:
  1. Straighten and crop the picture;
  2. Fix and saturate color;
  3. Improve the contrast and highlight/shadow detail;
  4. Sharpen image;
  5. Remove dust, scratches, and other blemishes; and
  6. Reduce grain and other noise in the image.
The results are not perfect -- certainly not as as nice as a new picture -- but they are not too bad, especially considering the original image. It took a lot of trial and error, but short of painting on color (which I did not do) the picture is quite usable. I even received a box of cookies and brownies out of it!

I am not trained in photo restoration, and undoubtedly a professional could do more. But, if you poke around at a hobby long enough -- and I've been poking around a digital archiving for a little while -- you can get pretty good results.

UPDATE

Ellen writes in the comments, "Way to go, Rob. That's pretty cool how you can do that." Thanks, Ellen. I enjoy doing it!

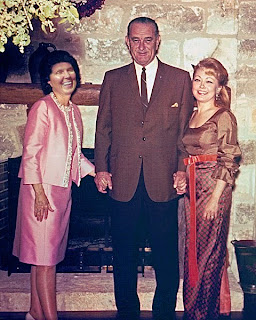
Craig then adds, "Now see if you can photoshop grandma next to LBJ."


I'm not great at photo manipulation but, what the heck, here by request is Ladybird Stutz. Now, if you can identify which image Grandma's face is from -- it is from one of Grandpa's slides -- I will be really impressed.

Tuesday, November 17, 2009

Scanning Slides - The Scanning Process

It has been a while since I discussed archiving techniques, but John recently sent in his slides, which I have been working through, and it got me thinking about documenting the process. Should anyone contemplate scanning slides, a checklist of steps might be useful. If for no other reason, this may help gauge the amount of time necessary for the task.

Here are the steps I take with slides, which I am scanning using my Nikon Coolscan V, a dedicated 35 mm film/slide scanner that scans only one slide or filmstrip at a time.
  1. Remove all slides from their storage sheets.
  2. Sort slides by decade and then year.
  3. Sort the earliest year of slides by the date the slide was developed, grouping the different rolls of film (using the information printed on the slide frame) in chronological order.
  4. Clean the first slide (I use a feather duster).
  5. Scan the slide. This simplicity of this step is a bit deceptive, because with all the image enhancement I use (to eliminate some dust and scratches, restore color, and minimize film grain) scanning time takes 4-5 minutes per slide. This results in an image just under 23 megapixels per slide, with a file size (in TIFF format) that is just over 65 megabytes.
  6. Repeat scanning for all slides.
  7. Rename all files to reflect the fancy pants file naming system that incorporates the information from the slide frame.
  8. Return all slides to their storage sheets.
And that's it for the scanning! For John's 138 slides, scanning will take about 10.5 hours and result in files occupying about 9 gigabytes of hard drive space; additional time is needed for the other non-scanning tasks. Some of these tasks can be accomplished will the previous slide is being scanned. You have been warned.

But, that's not the end of the image preparation! These files are too unwieldy, so I batch convert them in Photoshop Elements 5 from TIFF format to PNG format. This cuts many file sizes in about half without losing any information or degrading the quality. JPEG format can degrade an image but has a much smaller file size, so I typically use it only for distributing final versions of images.

I generally batch convert to several different sizes and formats for each image -- 100% size PNG image (for archiving as the "original"), 50% size PNG image (for further editing), 50% size JPEG (for distribution), and 10% size JPEG (as the "thumbnail" for quick viewing). I use the 50% size PNG image as the original for the JPEG images if I have edited the PNG image. These four versions of each image together often take up 40-50 megabytes, which, while substantial, is notably less than the original TIFF image. My terabyte hard drive has plenty of room (for now!) for all these images.

I have discussed image editing a bit in other posts, and likely will discuss it more in the future, but for now the above is the process I use for scanning slides. Whew!
Friday, November 6, 2009

Cleaning Up Old Pictures

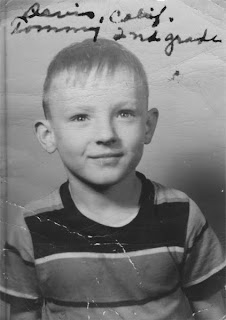
Today's school portraits of Tom included one very cute shot of him in second grade from 1952.


The picture has some obvious bending and cracking in it, but these are consistent with the age of the photo and -- at least IMHO -- do not distract from the portrait. The original picture, however, needed lots of work to look this good. Here is the original:

I picked this picture for more aggressive image editing than I typically use because it provides some good examples of how to clean up an old picture. All of these steps were done in Photoshop Elements 5, an older version of the program that I have and use for almost all of my editing. Note that I always copy the image to a new file before editing so that I do not mess up the original image.

Here are the steps I took to prepare this picture of Tom.
  1. I cropped the picture very tight around Tom to 1) maximize the amount of space showing Tom and minimize the amount showing the background, 2) eliminate as much writing as possible from the top, and 3) eliminate the vertical line on the left side.
  2. I cropped the picture to a 3x4 ratio, a standard ratio I use for almost all of the portraits, to provide a consistent look.
  3. I resized the image to 450x600 pixels because I typically limit the largest size of the image to 600. I know this is small, but I do it this way because 1) the images take up less space on the blog and load faster, 2) this is the standard size I use, and 3) I have maintained the original in its full size for when I need the larger image.
  4. I used Easy.Filter to improve the image contrast, using the automatic setting for the shadows (dark portions) and manually setting the highlights (light portions) to not blow out too many details.
  5. I used automatic sharpening in Photoshop.
  6. I used the spot healing brush tool in Photoshop to eliminate the most glaring cracks, marks, and writing on the image. This tool tries to match the area I select on an image with the surrounding parts of the image, making the cracks, marks, and writing less obvious. At this stage I was more aggressive than usual because there were no cracks across the face, which are more difficult to remove.
  7. I saved the edited image as a highest quality JPG file to ensure that it looked good when loaded. The highest quality setting produces larger files than a lower quality setting, but with the images being small the file size is also pretty small.
And that's it! I posted the pictures here so that you can see the technique I use. Perhaps you will learn something about cleaning up old pictures or maybe even -- should I be so lucky -- you will share some of your techniques with me.

If you open both images in two separate browser tabs and click back and forth between them, you can see the differences between them more easily.

Wednesday, September 30, 2009

Sharpening Pictures

I messed something up yesterday, so I am going to try and turn it into a teachable moment.

I posted a mystery picture that looks fine but could look better. Right click on the link and open it in a new tab. Here is the same picture looking a little better; right click on the picture and open it in a new tab, too.

Now, click back and forth between the two tabs with the different pictures and see if you can see the difference. Today's picture looks a little better, a little more crisp; let's call it a little more sharp. Can't see the difference? Check out the tree leaves as you jump back and forth between the tabs; see how they pop into focus and are less blurry? Or, the pattern on Annette's dress? Once you get used to seeing it, everything looks a little more sharp.

What I forgot to do to yesterday's picture, which I corrected on today's picture, is to use the "sharpen" tool in Photoshop after I shrank the picture down to viewing size. Some programs, including Photoshop, call it "unsharpen mask". Sharpening increases the contrast between closely located pixels in an image, making their edges look more distinct. Many programs allow sophisticated adjustments of the sharpening process, which will yield vastly different results. Or, you can do as I did here and use the software's automatic sharpening function.

Wikipedia has a good article on the process.

Oversharpening an image will make it look anywhere between weird and bad. It is always better to not sharpen or undersharpen an original image, since you can always apply the sharpening process to a copy (don't mess up the original!) later in Photoshop or whatever program you use.

Tuesday, September 8, 2009

Easy Editing? Easy.Filter!

Digitizing family history is a difficult task on a lot of levels. Sometimes, though, a tool shows up that makes the task a bit easier. Let's look at one.

The picture of G&G, out of the album and into the scanner, shows its age:

There are many tools out there, both free and otherwise, to improve the image. The Photoshop Elements I use can do many things, but does not do everything I want as easily as I want it to. Easy.Filter Smart Curve, a Photoshop plugin, suits me fine because it adds features not available in my Photoshop Elements, automates some tasks, is FREE, and, most importantly, works well.

When I run G&G's picture through Easy.Filter's automatic mode, I get:

What a huge improvement! It's not perfect, but it looks much better with Easy.Filter and a little effort. That, gentle reader, is what's known as a bargain purchase -- value added with little cost and effort. I didn't learn how to do this overnight, but I tried different tools until I found one that worked well for me. Which is probably another tip.

TIP: Don't be afraid to try different tools until you find one that works well for you.

UPDATE

Dave writes in the comments, "'Gentle reader?' You sound like Steven King..." Actually, I was going for Isaac Asimov, but whatever.

Equipment and Software

The equipment I use is as follows:
  • A Fuji S6000FD digital camera, which is discontinued;
  • An Epson 2480 Photo flatbed scanner, which is also discontinued; and
  • A Nikon Coolscan V dedicated 35 mm film/slide scanner, again discontinued.
It is not terribly high tech, but it works well for my purposes. Each has their strengths and weaknesses, which I hope to document.

The software I use is as follows:
  • Photoshop Elements 5.0 for photo editing;
  • Nikon Scan 4.0 for the Coolscan;
  • MS Word or even WordPerfect (yes, WordPerfect) for page layouts and PDF saves; and
  • PDFCreator or other PDF print drivers for PDF saves.
This software basically came with the equipment I purchased, or was purchased for other uses, or is available (in the case of the print drivers) for free, legal download. Basically, I have used the tools available to me to do the best job I can preserving the family history.