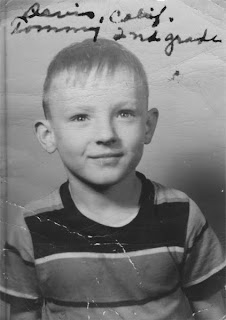
The picture has some obvious bending and cracking in it, but these are consistent with the age of the photo and -- at least IMHO -- do not distract from the portrait. The original picture, however, needed lots of work to look this good. Here is the original:
 I picked this picture for more aggressive image editing than I typically use because it provides some good examples of how to clean up an old picture. All of these steps were done in Photoshop Elements 5, an older version of the program that I have and use for almost all of my editing. Note that I always copy the image to a new file before editing so that I do not mess up the original image.
Here are the steps I took to prepare this picture of Tom.
- I cropped the picture very tight around Tom to 1) maximize the amount of space showing Tom and minimize the amount showing the background, 2) eliminate as much writing as possible from the top, and 3) eliminate the vertical line on the left side.
- I cropped the picture to a 3x4 ratio, a standard ratio I use for almost all of the portraits, to provide a consistent look.
- I resized the image to 450x600 pixels because I typically limit the largest size of the image to 600. I know this is small, but I do it this way because 1) the images take up less space on the blog and load faster, 2) this is the standard size I use, and 3) I have maintained the original in its full size for when I need the larger image.
- I used Easy.Filter to improve the image contrast, using the automatic setting for the shadows (dark portions) and manually setting the highlights (light portions) to not blow out too many details.
- I used automatic sharpening in Photoshop.
- I used the spot healing brush tool in Photoshop to eliminate the most glaring cracks, marks, and writing on the image. This tool tries to match the area I select on an image with the surrounding parts of the image, making the cracks, marks, and writing less obvious. At this stage I was more aggressive than usual because there were no cracks across the face, which are more difficult to remove.
- I saved the edited image as a highest quality JPG file to ensure that it looked good when loaded. The highest quality setting produces larger files than a lower quality setting, but with the images being small the file size is also pretty small.
If you open both images in two separate browser tabs and click back and forth between them, you can see the differences between them more easily.
.png)
No comments:
Post a Comment